
PLAY Introduction
Jira (pronounced JEE-rə) is a proprietary issue tracking product developed by Atlassian and can be used for just about anything! It can be a project management tool, software development tool, Agile tool, bug tracking, operational task management, team collaboration hub, strategy alignment, progress reporting, risk management, support center or just getting stuff done tool. This play will walk you through how I have set up Jira for getting work delivered!
PEOPLE
1 Global Administrator for Jira and 2-6 end users for requirements and input on system configuration.
TIME
30-90 Minutes. This will be dependent on the experience of the administrator and level of definition of requirements.
NINJA LEVEL
Practitioner to Master. Anyone can learn how to administer Jira but it may take practice to run this play efficiently.
PREP WORK
PEOPLE
This is key to successful meetings. Make sure all key stakeholders are on the invite. You need their buy-in from the start!
PLACE
Virtually or in-person it is critical that everyone has face-time with each other. So make sure that if attending virtually that everyone can connect in video chat. You will also need to share ideas, so a whiteboard is important and a space that fosters creativity and innovation.
THE PLAY
All of our plays are five steps or less! However, you may need to run multiple plays to get the most out of this one. Don’t worry – you can do it! Learn the play, rehearse it regularly, apply it in the field and debrief on the outcomes. If it worked well, use it again; if it didn’t, find out why. Are there new factors in the system you need to consider, or do you just need to keep practicing? If you need help or have questions on this play, contact us!
01
SET THE STAGE
Who are the players?
Every winning team knows which players to have on the field and what talent you need on the ready. To successfully deploy this play you will need the following roster:
![]() Meeting Facilitator: Likely this is you! But you don’t have to do it alone, ask a friend (think of it like a football team that has a coach for different parts of the team). Skills needed:
Meeting Facilitator: Likely this is you! But you don’t have to do it alone, ask a friend (think of it like a football team that has a coach for different parts of the team). Skills needed:
- Keep the team focused on the goal!
- Foster a positive and creative space for all
- Organized and prepared to run play
![]() Jira Administrator: Configures and administers Jira Software, Jira Core and/or Jira Service Desk, and related products such as apps. Manages global settings including users and groups, roles, global permissions, and schemes. Creates projects, sets up project permissions, and assigns Jira project administrators. Skills needed for this play:
Jira Administrator: Configures and administers Jira Software, Jira Core and/or Jira Service Desk, and related products such as apps. Manages global settings including users and groups, roles, global permissions, and schemes. Creates projects, sets up project permissions, and assigns Jira project administrators. Skills needed for this play:
- Ability to create a project space
- Ability to create a issue type
- Ability to define issue hierarchy
- Ability to create custom fields and workflows
- Ability to create and manage boards
![]() System End User(s): A person that a software program or hardware device is designed for. The term is based on the idea that the “end goal” of a software or hardware product is to be useful to the consumer. End users are also in a separate group from the installers or administrators of the product. To simplify, the end user is the person who uses the software or hardware after it has been fully developed, marketed, and installed. Skills needed for this play:
System End User(s): A person that a software program or hardware device is designed for. The term is based on the idea that the “end goal” of a software or hardware product is to be useful to the consumer. End users are also in a separate group from the installers or administrators of the product. To simplify, the end user is the person who uses the software or hardware after it has been fully developed, marketed, and installed. Skills needed for this play:
- Articulate requirements and needs
- Learn system functionality and features
- Test configuration and provide feedback
Get the field ready!
![]() Schedule the meeting in advance. Don’t wait until the last minute to schedule the meeting. You want people to be excited about it but not so last minute that they have no time to prepare.
Schedule the meeting in advance. Don’t wait until the last minute to schedule the meeting. You want people to be excited about it but not so last minute that they have no time to prepare.
![]() Include an agenda. Set expectations – this will help keep your meeting on track. Include schedule and any prep work needed. Also let them know if it is okay to invite others or not. Remember that if you have to many people in the meeting, it will be difficult to facilitate brainstorming sessions without breaking out into smaller groups.
Include an agenda. Set expectations – this will help keep your meeting on track. Include schedule and any prep work needed. Also let them know if it is okay to invite others or not. Remember that if you have to many people in the meeting, it will be difficult to facilitate brainstorming sessions without breaking out into smaller groups.
![]() Prep the room. Arrive early and get ready. If it is in a physical room, get whiteboards ready, enough chairs for everyone, water and snacks are always a hit! If virtually, a central location for notes, brainstorms and follow-up items. Test connectivity in the meeting room and make sure there is enough seats for all participants.
Prep the room. Arrive early and get ready. If it is in a physical room, get whiteboards ready, enough chairs for everyone, water and snacks are always a hit! If virtually, a central location for notes, brainstorms and follow-up items. Test connectivity in the meeting room and make sure there is enough seats for all participants.
02
CORE ACTIVITIES
CREATING THE PROJECT SPACE
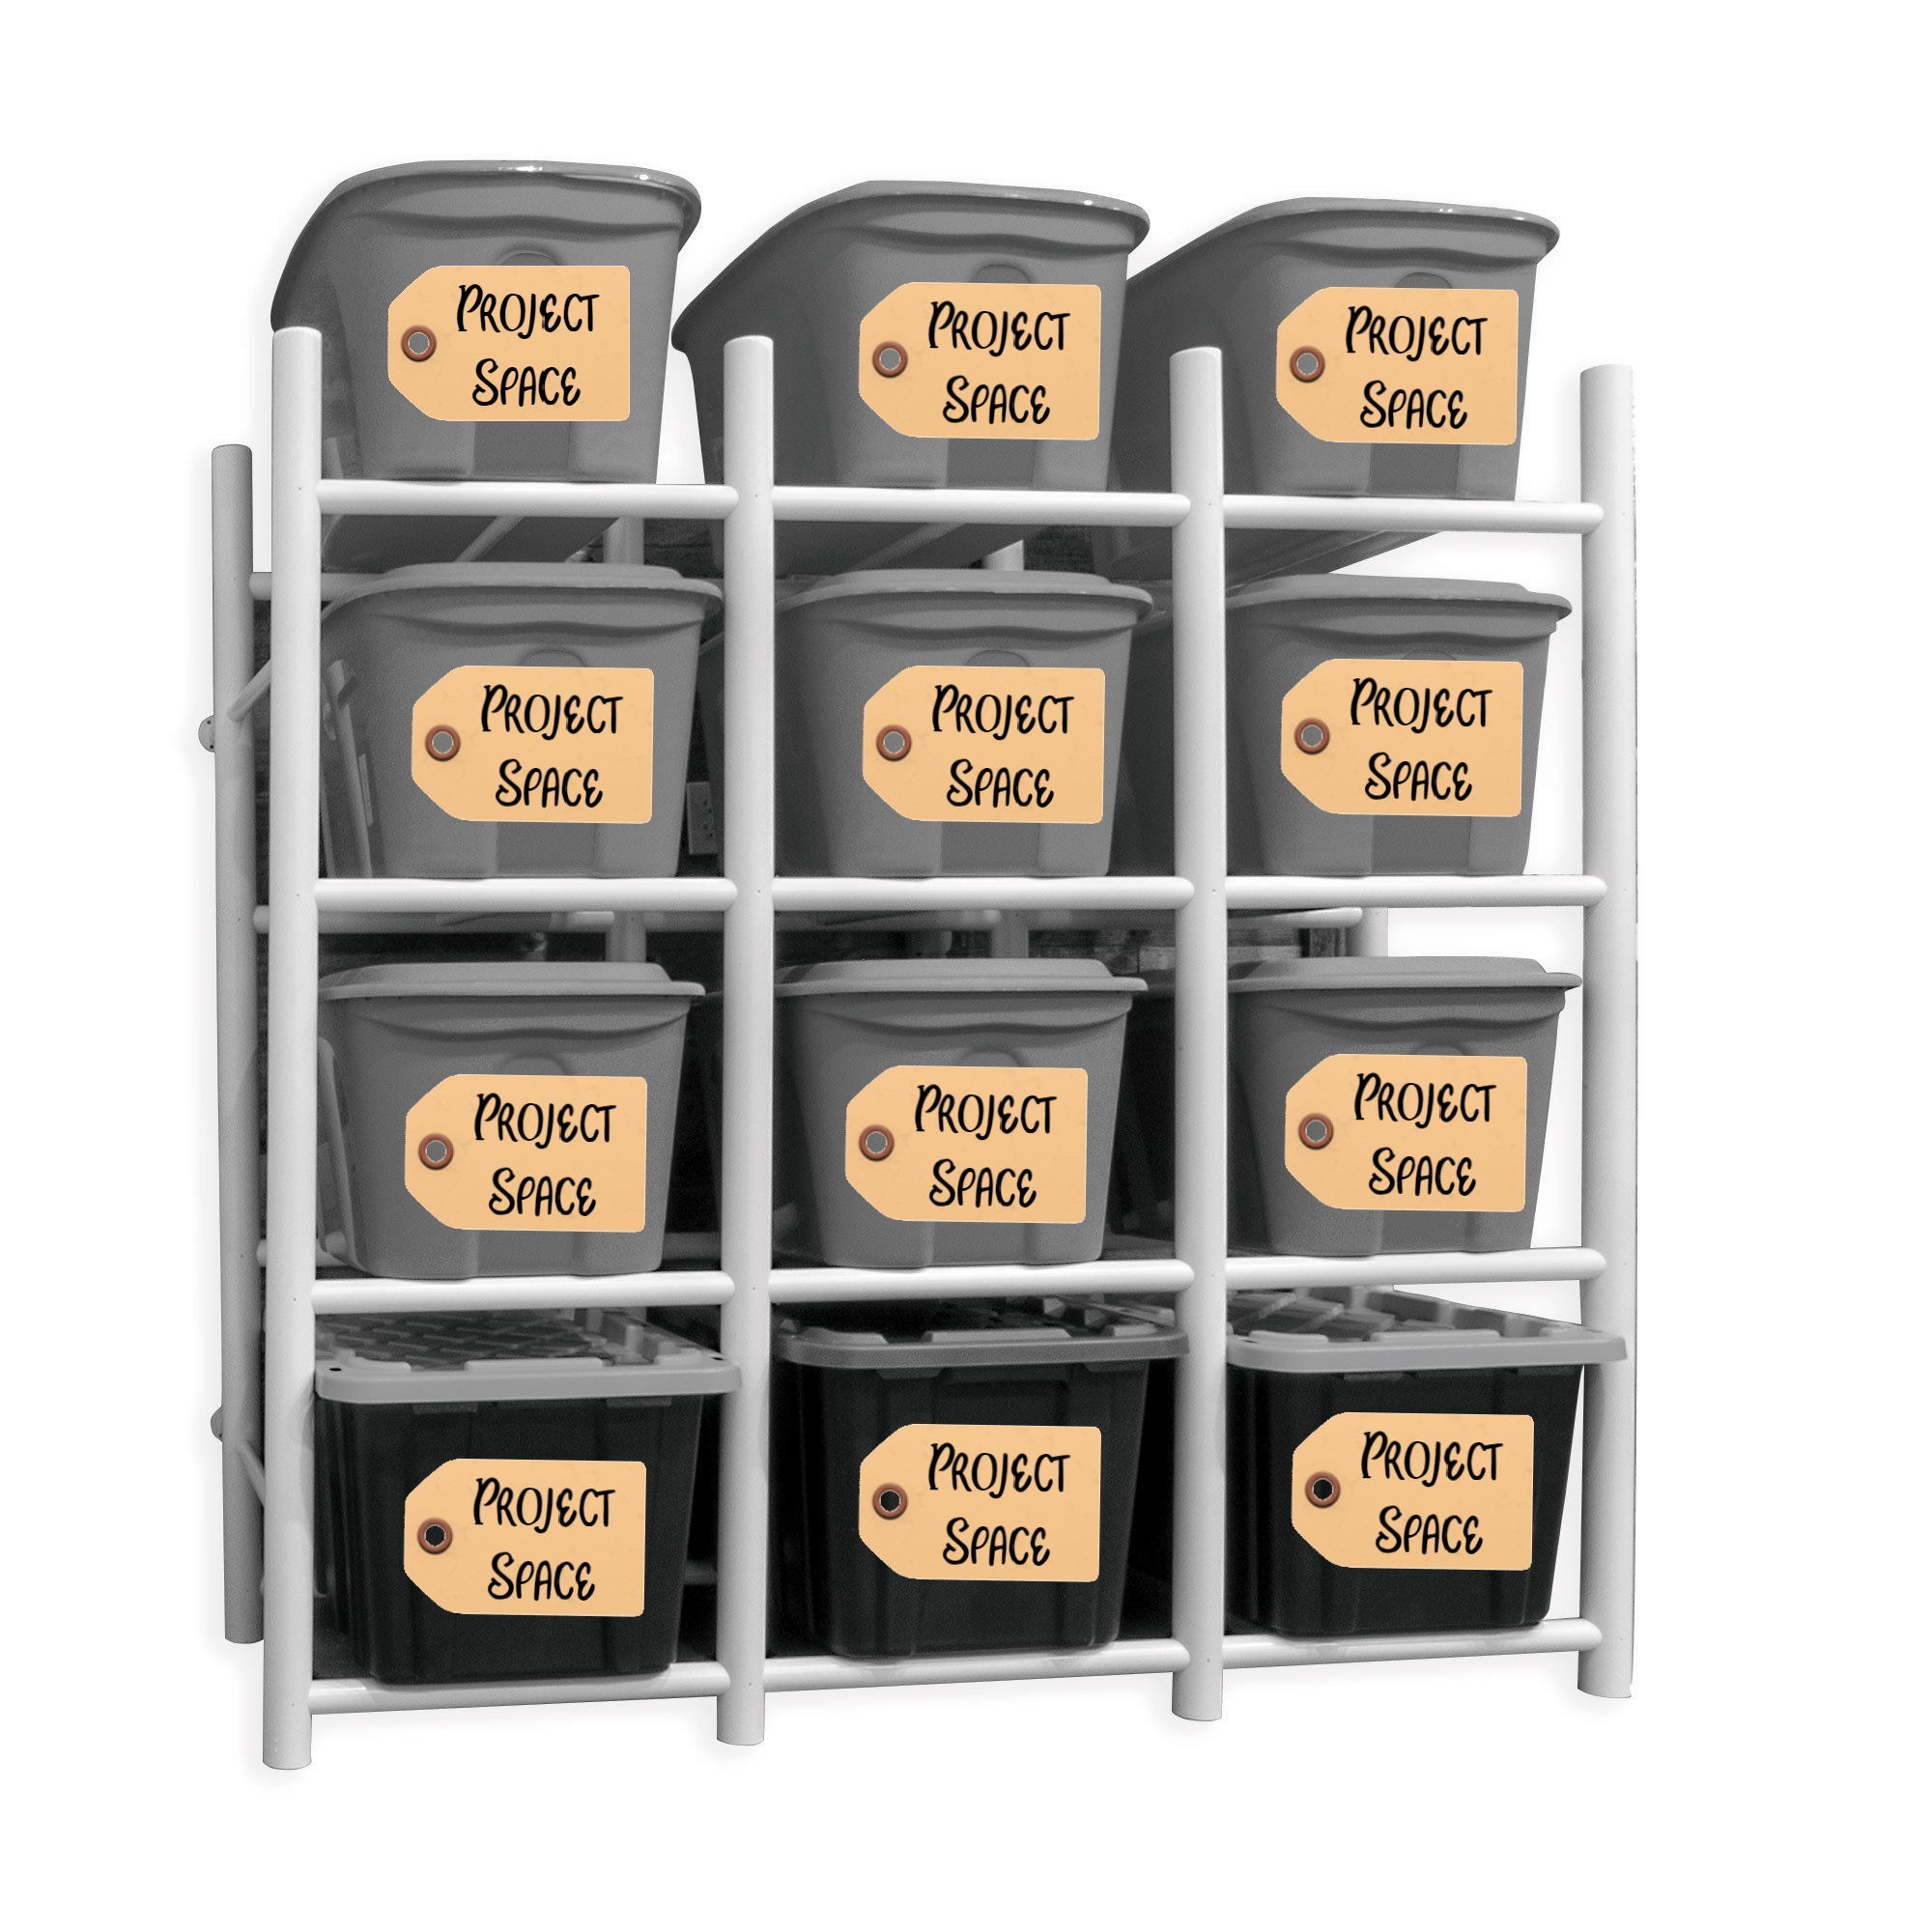
In Jira you will need to create a project space. When you think of how you would like to architect the system, think of a “project” space as the very largest top-level container. This could be a product, system, department, campaign, segment or a project. I think of it like I would organize a garage, you buy the really large tote boxes first, and this is your label.
Now it’s time to create the project space in Jira:
- Log in to Jira with Administrator account (if you do not have permission, contact your Jira administrator for more information)
- Click Administration (
 ) > Projects.
 - Select “Create Project” button
- You will now be presented with a few options to choose from. Each option comes with some handy built in tools (boards). This really depends on how you plan on using the space. Check out our play on Agile, Waterfall or Hybrid on different ways to run a project or product. I use hybrid (“Structured Agile”) for most of my projects, so I selected the Scrum Software Development template

- You will now be presented with a few options to choose from. Each option comes with some handy built in tools (boards). This really depends on how you plan on using the space. Check out our play on Agile, Waterfall or Hybrid on different ways to run a project or product. I use hybrid (“Structured Agile”) for most of my projects, so I selected the Scrum Software Development template
- Give your space a name. This will be how the project space shows up in the menu, so name it something that will tell users about what to expect in the space. This is not a time for code names unless everyone knows what it means.
- Assign a key for the space. This will be the prefix for the ticket number, again pick something that makes it easily recognizable to the end user in a report or search result. Jira will pick one for you, but you can change it to whatever you want within limits.
- Last pick a project lead. This person will get notifications on the space so pick someone who is highly engaged and supports the team and success of this space.
- Then click Submit – that’s it! You’re done with creating a project space. If you chose one of the templates, Jira will do all the rest for you.

CUSTOMIZE THE PROJECT SPACE AND CREATE A HIERARCHY
Now that we have our project space defined, it’s time to set up how other boxes will be organized within our tote. Some templates have a built in hierarchy, but to align to a strategy you will likely need a few more levels. This is how I have configured Jira for my organization:

To create this hierarchy you will need to create a few new levels, which are called Issues (in the diagram above labeled as Initiatives, Features and Stories) in Jira. To create new issue type:
- As Jira Administrator, select > Issues.
- Click Issue types > Add issue type.
- Enter a name and description for your new issue type. First one you will need is “Initiative” (usually does not ship with most templates).
- This will be how the issue shows up in the menu, so name it something that will tell users about what to expect in the space. This is not a time for code names unless everyone knows what it means.
- Choose between a standard or sub-task issue type. Sub-tasks can be used for smaller pieces of work that are associated with a standard issue.
- All of these are top-level issue types, so choose “Standard Issue” for this hierarchy.
- Click Add.
- Repeat for next levels.
- If using Agile or Scrum, the template ships with Epics (used for Features in above diagram), Stories and sub-tasks, so no further issues are needed.
Now that you have all these issue types created, you need to customize and associate to the project space. This is where it gets a bit tricky, but stick with it – and you will have a smooth operating system in no time at all. As a Jira administrator, you can associate an issue type scheme with multiple projects to better manage issue types in one go.
- Select > Issues.
- In the Issue types section, click Issue type schemes.
- Click Associate for the scheme you want to associate with a project.
- Find the projects you want to associate with the scheme and click Associate.
- If you did not select a project template with a scheme, you will need to create that first before completing the above steps
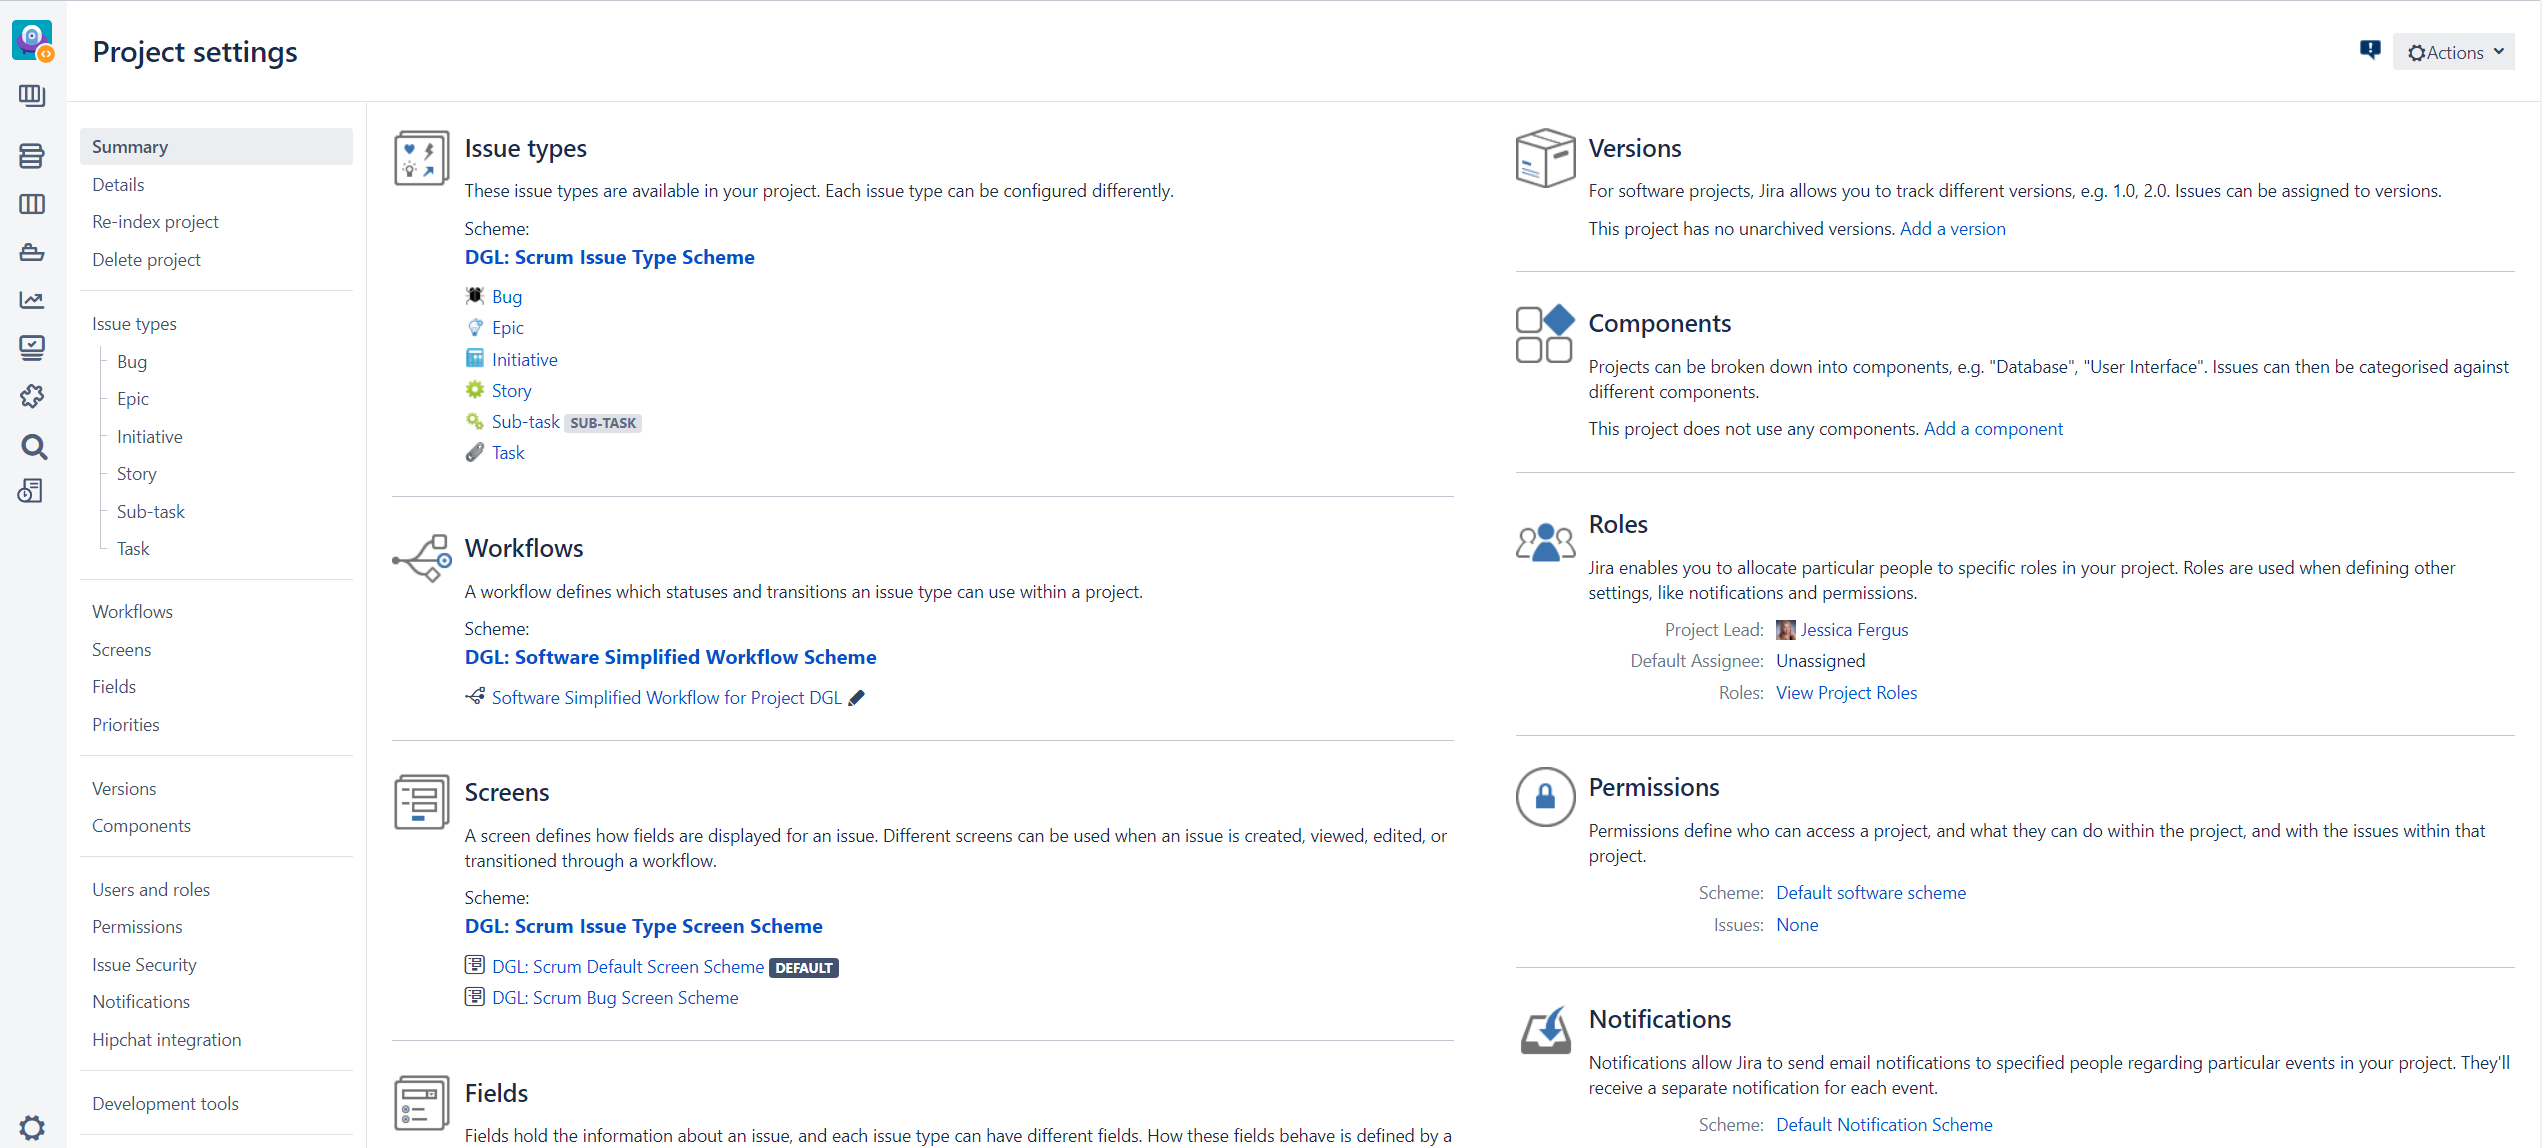
With Project Admin rights or Jira Admin, you can check your configuration by selecting the Project Settings icon within your project and viewing the set up. Here is how I have configured our space:
WORKFLOW AND STATUSES
The final piece that you will need to set up is the workflow. A Jira workflow is a set of statuses and transitions that an issue moves through during its lifecycle and typically represents processes within your organization. If you used a template configuration then you will already have a base workflow to start with that you can customize as needed for your end users. Workflows can be associated with particular projects and, optionally, specific issue types, by using a workflow scheme.
My recommendation is to KEEP IT SIMPLE at first. Everyone knows what To Do, In Progress and Done mean. Unless you have a group of power users who have used Jira before or are in a heavily regulated industry, complicated workflows just confuse new users. You want the system to be something anyone’s Grandparent could use and get value from on day one!
Here is how SIMPLE I have configured our space to start with for all issue types:
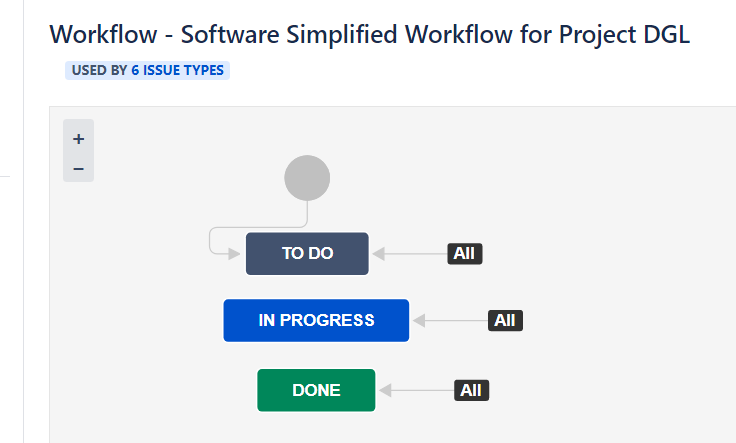
Here’s another example of a simple default workflow:
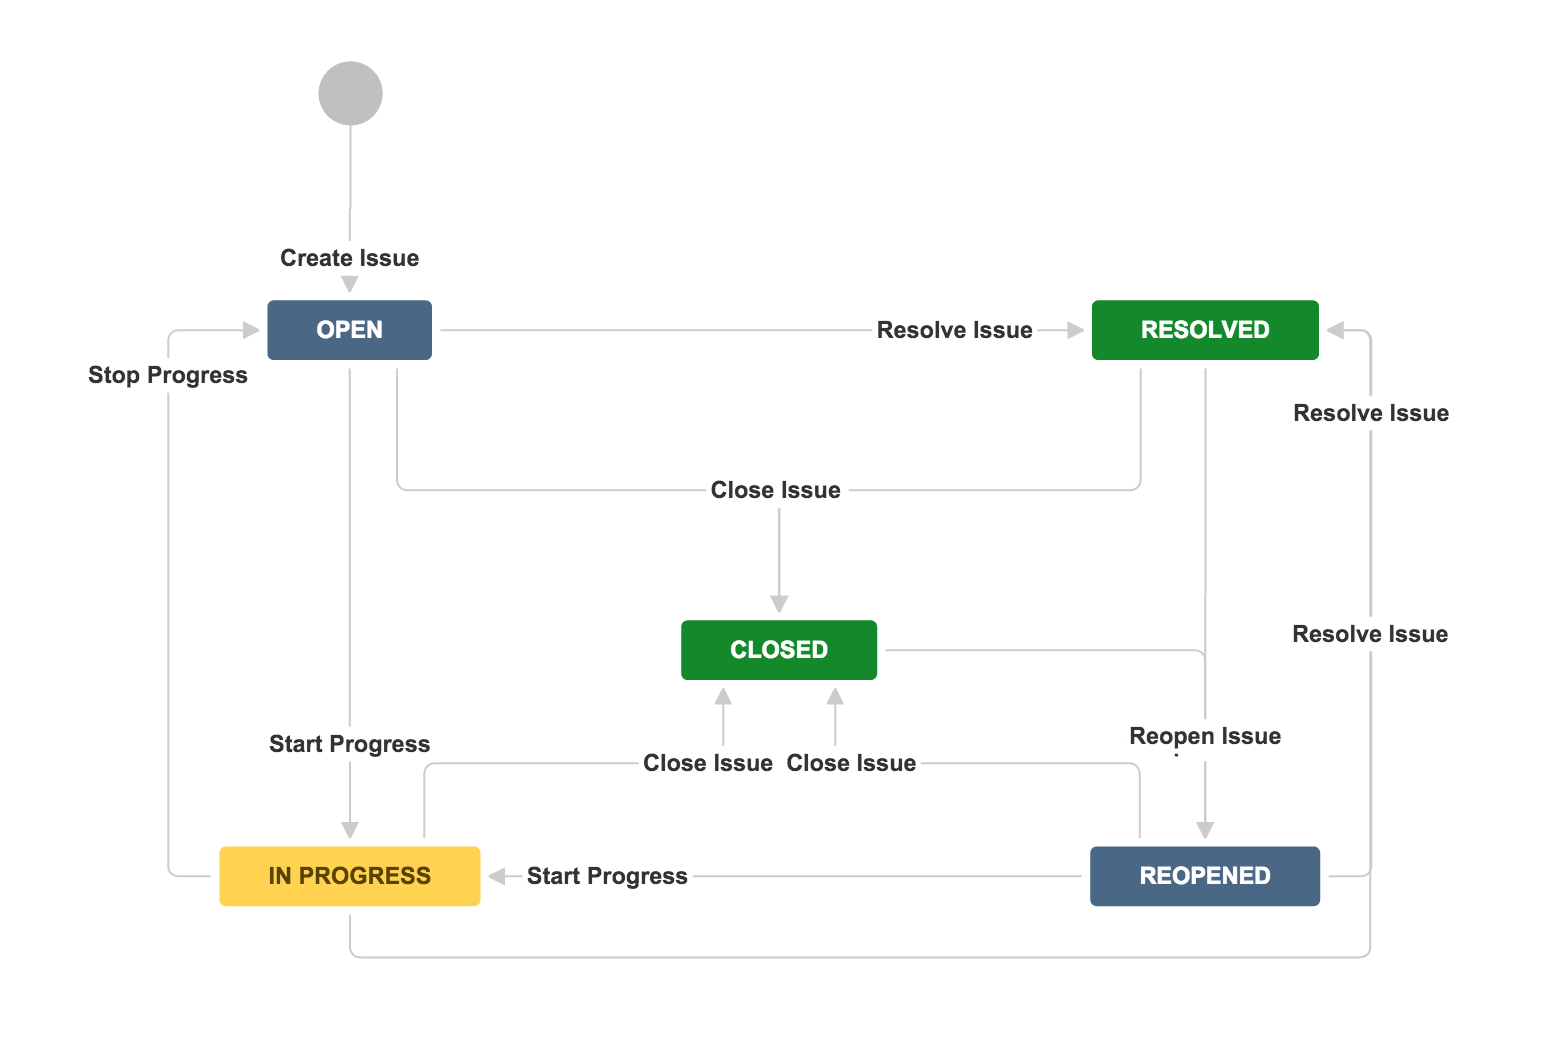
If you work in a regulated industry (like I do) then be sure as you mature your workflows that you capture any approvals, documentation or validation and try to automate it where possible. Make it easy to do the right thing and difficult to do the wrong thing. Use the power of Jira and Marketplace add-ons to provide oversight of the work being delivered. Think about the generation of evidence output as you architect the solution.
Statuses and transitions
A status represents the state of an issue at a specific point in your workflow. An issue can be in only one status at a given point in time.
A transition is a link between two statuses that enables an issue to move from one status to another. In order for an issue to move between two statuses, a transition must exist.
A transition is a one-way link, so if an issue needs to move back and forth between two statuses, two transitions need to be created. The available workflow transitions for an issue are listed on the View issue screen.
Editing a project’s workflow
Whenever you create a new Jira project, your project automatically uses the default workflow scheme. The scheme associates all available issue types in the project with the Jira system workflow. Since neither the Jira system workflow nor the default workflow scheme are editable, Jira creates an editable copy of the system workflow and workflow scheme for your project.
- Choose Administration () > Projects, and select the relevant project.
- On the Administration page for the project, click Workflows.
- Click the ‘edit’ icon at the top-right of the box, and Jira automatically does the following:
- Creates a draft copy of the system workflow named ‘Y our Project Name Workflow (Draft)’.
- Creates a new workflow scheme for the workflow named ‘Your Project Name Workflow Scheme’.
- Associates any existing issues in your project with the new workflow.
- You can now edit your draft workflow. Click on a status or transition to see editing options in the panel that appears.
- When you are finished, click Publish. The dialog allows you to publish your draft and, optionally, save your original workflow as an inactive backup.
 Recommended Resource
This is just the beginning. There is so much more you can do with Jira. I recommend learning as much as possible about the vast functions and features through the Atlassian University

TRY IT OUT
Give it a test drive and see what it can do. I would recommend a few test tickets first to learn with before adding your entire portfolio to the system. Get a few end users to pilot the system and provide feedback on what works and what needs adjustments. This will ensure that you have a system that delivers true value for the organization.![]()
03
 TEAM HUDDLE
 TEAM HUDDLE
Time to run the Team Huddle play. Ask the team the following questions and then take a vote. Keep follow-up questions to a minimum and capture any issues raised as an offline follow-up (and be sure to follow-up).
Understand the play?
![]() The play was understood and I asked any questions in time!
The play was understood and I asked any questions in time!
![]() I’m not sure I understand and I have some questions …
I’m not sure I understand and I have some questions …
![]() I did not understand the play or my part in it.
I did not understand the play or my part in it.
Did you get in the game?
![]() Yes, I made my moves and was in the right place at the right time!
Yes, I made my moves and was in the right place at the right time!
![]() I’m not sure I understand what I was supposed to do …
I’m not sure I understand what I was supposed to do …
![]() I kept the bench warm and watched from the sidelines.
I kept the bench warm and watched from the sidelines.
Ready for what’s next?
![]() Yes, I know the game plan and ready to win!
Yes, I know the game plan and ready to win!
![]() I’m not sure what’s next or if I am involved …
I’m not sure what’s next or if I am involved …
![]() No clue what’s next and would rather sit it out.
No clue what’s next and would rather sit it out.
04
NEXT STEPS
Phew! The hard part is done! You might be tempted to go further and create a bunch of workflows, custom fields or screens – but don’t! Instead congratulate the team on a very successful first go and give some time for them to try it out!

![]() Schedule the next meeting where the team will regroup and give feedback on the system set up. Set a regularly reoccurring meeting cadence so that the team stays engaged and is front of mind.
Schedule the next meeting where the team will regroup and give feedback on the system set up. Set a regularly reoccurring meeting cadence so that the team stays engaged and is front of mind.
![]() Publish your notes in a central repository that the team has access to immediately. Even better if it is someplace that the team can add comments or collaborate on. Keep the creative chat going!
Publish your notes in a central repository that the team has access to immediately. Even better if it is someplace that the team can add comments or collaborate on. Keep the creative chat going!
05
IT’S A WRAP
You did it! Now just a few follow-up items:
- Reflect on the play. Ask yourself how it went? What could have gone better, what could have gone worse? In sports this is watching the game again to see any plays that could have been better. Update your playbook. Build feedback loops that help you see what’s working; what’s not; and how to continue to develop the playbook by learning, adapting and iterating constantly as situations change and new challenges arise.
- Contribute to the community of Playbook.Ninja. Sign-up for an account and receive updates on when new plays are added and help others by commenting on the plays with what worked or your experience.
Thank you for being a Playbook.Ninja
![]()
Warren Little says:
Good stuff Jessica. I’m really starting to dig this playbook delivery method. Keep posting and I’ll keep reading 🙂
Jessica Fergus says:
Thanks Warren! That feedback is incredibly valuable to me and I really appreciate you taking the time to post and read my playbooks. This is just the cup of motivation needed for the next set of plays I want to published.